Welcome to your new website. Your first task is to turn the new user notification into secure access that you can use whenever you need to update your content. This Digital Rebellion guide takes you from that email to your first successful dashboard visit, without needing any technical knowledge.
Before you start Have your welcome email, the email account associated with your website user and a password manager available. Your website account is separate from your hosting account, domain registrar and any WordPress.com account. Use the login address provided in your handover rather than trying unrelated account portals.
Step 1 — Check your welcome email Open the new user notification or the customised Digital Rebellion welcome message. Identify the website address, your username and the password-setting link. Check that the domain belongs to your business. If the message was unexpected, verify it through your existing Digital Rebellion contact before using it. Do not forward the password-setting link to colleagues; each person should have their own account.
If the email is missing, search your inbox for the website name, WordPress and your username. Check spam and junk folders. Ask Digital Rebellion to confirm the email address on your account if nothing arrives. Repeatedly requesting new emails can make it difficult to identify the latest valid link.
Step 2 — Create your password Follow the password-setting link. Keep the generated strong password or create a long, unique password with your password manager. Save it against your website’s login address. Confirm the change using the button shown on the screen. An expired or already-used link is not a reason to create another website account: request a fresh reset from the login screen instead.
Step 3 — Open the correct login screen
Use your supplied login URL. On a standard installation, the address is usually https://yourdomain.example/wp-admin/ or https://yourdomain.example/wp-login.php. Replace the example domain with your own. Some websites deliberately use a different login address, so your handover instructions take priority.
Enter your username or registered email address and the password you saved. Choose Log In. Use Remember Me only on a device you control. If two-factor authentication is configured, complete the additional verification with your own authenticator or approved method. Store recovery codes securely, away from this public knowledgebase.
Step 4 — Confirm that you reached your dashboard You should now see WordPress administration navigation and the website name. Open the website in a second tab so you can compare the public view with the editing area. Bookmark the login page, then visit your profile and confirm your display name and contact email. A profile email change may require confirmation.
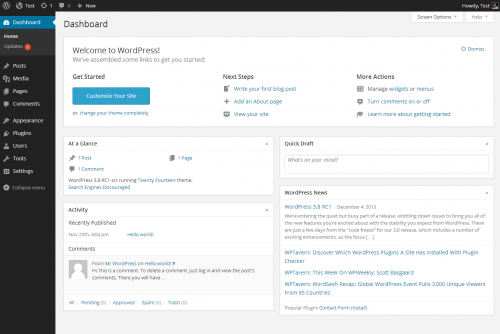
If you cannot log in Use Lost your password? on the login screen and enter your account email or username. Wait for the newest reset email. If the browser says cookies are blocked, allow required site cookies and try a private window. If the account is temporarily locked, follow the site’s instructions or contact Digital Rebellion rather than making repeated attempts. A valid password will not fix an incorrect login URL.
Your first-login checklist Confirm that you can log out through the account menu and sign back in using the saved credentials. On a shared computer, close the browser after logging out. Never send passwords or authentication codes in a support request.
Frequently asked questions Can everyone use my login? Give each team member a separate account so access can be removed without changing everybody’s password.
Why can I not see every menu? Your assigned role controls access. A content editor does not automatically need administrator permissions.